Sunday, 9 December 2012

Look Theres a Targa Over There

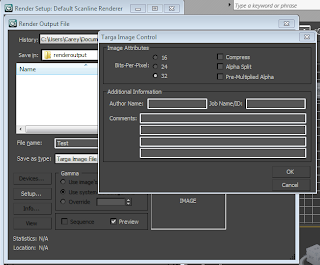
Rendering in 3DS used to be very irritating, halfway through the render the program most likely crash, or the file size would reach the maximum and it would refuse to render further. That was until I discovered the magical thing known as rendering in Targa Images. This renders each frame as an image that can then be imported into Premier Pro by selecting import and numbered stills. This setting is amazing because if the program crashes (as it often seems to do with me) you can just continue rendering from the previous rendered images (For example if it crashes at image 0135 you can continue rendering from frame 136)
Render Set Up used when rendering the scenes

Targa set up
Targa files

So Much To Do So Little Time

So it comes to this, the end of the module. I have learnt many new techniques, most of which I have written about. But there is always that feeling of if I had more time I would do this and that. Well if I did have more time I would've added more explosions and details in the Pearl Harbour scene, as well as slowing down the other scenes. Other then that I am happy and satisfied with what I have produced and animated.

Overall I am impressed with what I have managed to accomplish in this module. I have managed to create my own realist looking water. I have managed to effectively use the various particle systems and space warps. I believe I have also managed to master the art of low poly modelling, something that I found difficult last year. When it comes to the day light system I have improved the the out put by just adjusting a few settings, the same can be said for creating materials. I have found that I am relying less on the ready made materials and more on creating my own. All in all I believe I have made a big leap in my knowledge of the software compared to last years module, as well as the out come of my models and animation. There are a few things that I would like to improve and create such as organic modelling, but there is always the character modeling module next semester!

Bang Goes the Harbour

And so it comes to the final scene where we blow up various different models. I took Mel's Pearl Harbour and added the water I created around it. Cam added the US planes and a run way before I added the Japanese plane and the bomb that Jan had created. I then attached both the plane and the bomb to a path constraint. From then I used the array bomb to blow up the ship.

Flight Training For America

It was decided that a second plane will be needed to place on Pearl Harbour. This second plane would have to be American. To create this plane, I took the original one I created for the Japanese and extruded the nose, as well as change the shape of  the windows as well as changed the colours to grey.

Quick! Catch That Document!

Using Jan's office model, I placed a plane on the desk and added the Bomb Plot document to the materials before adding it the plane. Jan and myself then selected the plane and went into the modify tab. From there we went into the drop down menu and selected cloth. Of all the materials we decided that the one that would act best like paper was spandex (who would've thought!) we then applied this to the document before going into the Space Warps, selected forces and then wind. Through a lot of trial and error we found the perfect angle, however the window needed to be moved. Jan moved the window and added a camera. I adjusted the angle of the camera and added some motion to it, and we were done with that scene. What can be described as possibly the funniest thing we have ever done in 3DS!

Flight for Fright

I decided to quickly create a scene that is to go before Pearl Harbour gets destroyed. This involved me placing my plane into a scene with water and the day light system. I set the time on the light to 7.35 thus creating the right light for the time of the attack. I then multiplied the amount of planes in the scene before adding in the camera. I decided for a greater effect to place the camera behind the first plane, thus making it look as a single plane is going in for the attack, before rotating and panning the camera to reveal the others. I am hoping that by adding this scene to the animation will give it more suspense.

Don't Rock the Boat

The second scene I animated involves the boats that Cam created. Applied to the water from Let There be Water I then imported the boats into the scene before animating them with the set key tool. This gave them a realistic looking bob on top of the water. It was at this point that I attempted to add the rain without success.

X Marks The Harbour

The map scene is the first one to start being animated and it was nice to see everyone's work coming together. Jan used the displacement technique to raise certain parts of the North American map, I applied the X and the dot, as well as the water to the scene and Mel animated the dashes that appear in the water. I am happy with the way the scene has come out, the lighting really helps to illuminate the movement of the water and the way that I have positioned the camera helps to explain the movement of the ships that is thought to be a trigger for the war. Given more time I think one of the major ways the scene could be improved would be to slow it down a bit more as once render and imported into Premier Pro it goes a bit fast.

Wooden Plank

When creating the map scene, I noticed that when the camera zoomed out, the map sat on nothing. In order to rectify this problem, I decided to create a wood like texture. To do this, I went into the material editor, selected and empty slot and then clicked on standard. From there I went down the list and selected wood. I then adjusted the settings, such as tiling and colour until I was happy it. I then applied it to a plane under the map and continued with the render.

Light on the Shores

Adding light to my scenes was fun. I had used the day light system before so I was familiar with that. I did however learn how to use the the MrSun and MrSky system to go with it. This turned the day light system light into the sun and changed the background from being black and boring to that of the sky on a clear day. Not only did this improve the look of the scene but it also added some atmosphere to it. This was incredibly useful when creating early morning scenes as the time and date are reflected in the position of the sky and sun.

Lets Get Moving

After creating various scenes and the elements that go in them, the time has come to bring them to life. I have been tasked with animating the first scene (the map), the second scene (the ships moving from San Diego to Pearl Harbour), the paper scene (this scene will be done together with Jan, in which a piece of paper will fly out the window) and the attack on Pearl Harbour. I am looking forward to using my knowledge from last year and improving on it.

Playing With Fire and Arrays

I was looking to improve on the pretty average explosion I achieved earlier in this blog. I came across this tutorial on YouTube http://www.youtube.com/watch?v=PDGUaw0XrDg I thought this was a more exciting way to create an explosion as it included fire and smoke. I followed the steps of the tutorial without changing anything. I found that this was an easier way to create a realistic looking explosion, and the way the items break up differ to the way it broke up compared to the Space Warp bomb.This technique is something that will come in handy when animating the final scene.

Flight Training

Moving on from the low poly modelling technique learnt earlier (The Shed), I decided to try and create the Japanese Zero using it. I started off with a simple box. This was the base for the body. I moved the various vertex points and extruded various parts of the box until it was less box like and more circular. From then I furthered the technique by extruding from the body to create wings and a tail. To get the edges of the wing and tail flat, I selected the vertex points and scaled them down. For the curves on the wings I selected the end face and used the collapse tool. This created an edge from which I could move and manipulate until I was happy with what could be seen. I used the same technique to create the tail.

The start of the plane. This shape started off as a box. Using the soft poly modelling technique I have manipulated it into a cylindrical shape.
The little wings on the side of the tail were a bigger challenge, I tried many times to extrude them in a similar way to that of the tail and wings, however it did not look right. So to solve the problem, I created a box which I extruded, similarly to the wings, tail and blades on the propeller. From then I used the collapse technique to create  the rounded edge. I then used this image as a guide for the colours, this was the influence for the number on the tail:
This image can be found at: http://www.flickr.com/photos/59096145@N04/6213763907/


A Storm is Brewing

Following on from the smoke, I have attempted to use what I learnt to create rain, this time using a different particle system (PFlow) and this YouTube tutorial https://www.youtube.com/watch?v=yTSJyqHrWIo. I followed the tutorial, changing a few things as I went along. Using this tutorial I learnt a new way to create a particle system without using the modify tab, instead I pressed the number 6 on the keyboard and it came up with the particle view
Particle view with the particle system in it
View of the rain

I then used the second part of the tutorial to create ripples where the drops hit the water. This was successful but once done, I found that the particle system didn't fit in well with the scene.
Rain with ripples in the water.


Making Waves

After playing around with a few different Space Warps, I came across one that allows waves to be added to a plane, naturally I thought it would be useful to one of the scenes. I created a basic plane, I then added the space warp and adjusted the settings to what I thought would be a good wave height. To animate it, I selected the Space Warp and turned auto key on. I then selected the middle frame and changed the setting on the wave, this made the wave move allowing me to animate the ships with the wave movement.
The pink mesh in the Wave Space Warp

Prop Up

To create the propeller for the aircraft, I used the low poly modelling technique. I started off with a cylinder, this had 7 segments and had a small radius. I then converted it to an editable poly from which I selected the vertex points segment by segment, expanding them until they reached the desired width. I then went into the modify menu and selected FFD 2x2x2. From this I selected the top 3 segments and used the select and uniform tool to narrow the top of the propeller. The FFD tool worked similar to the soft selection tool. It narrowed the segments little by little. I then converted the object back into an editable poly, from there I added various smoothing groups. 1 for the front of the propeller, 2 for the back of it and finally 3 for one of the edges along the left hand side. 

Now propellers have a curve in them, to achieve this, I selected the twist tool from the modify menu. I then applied a 45 degree twist which gave it a curve similar to one seen on a real propeller.

Adding smoothing groups to the propeller

Adding the twist to the propeller
To create the center of the prop that holds all the bales in place, I created a basic cylinder and collapsed it, I use the same shaping technique as I used for the blade and to finish it off I used various different smoothing groups.


Water Training with Reactor

In my attempt at creating more realistic water I happened to come across a system that works with the Havock Reactor in 3DS Max. It work like the reactor normally does, allowing you to change the mass, friction etc of an object but, if you go into the Space Warps section and select reactor, you'll see the option come up for water. This works with Havok to allow objects to react with water how they should, for example, something with a substantial weight will sink where as something with a lighter weight will bob to the top of the water.The objects are then grouped together to form a rigid body object.
Objects with reactor water

Cylinder mass
Once the weights of the objects have been decided, the animation needs to be previewed within the reactor. From this window, you can see how the objects will interact with the water substance, this allows you to see the ripples and bobbing motion the objects create int he water. Once I was satisfied with the way the objects and water reacted with one another, I added a plane and attached it to the reactor water (exactly the same way as space warps are added). I added the Autodesk water to the plane and rendered the animation, this is how the water reacted with the objects:

UPDATE:
I have found this method of creating water very temperamental, I have tried to use it with the ship scene to no avail.

Problem Solved

Through trial and error I have managed to reolved the mirror and transparency error with the water. I have kept the same setting as before reguarding the components of the water. I discovered that the raytrace was the map causing the issue. I repaired this by going into the raytrace map, under the background settings clicked on non and added a water surface map. I then adjusted the colours of this map to a very light blue and white. From there I went back to the parent, and reduced the refraction settings from 100 to 45.

Maps in material editor

In the raytrace map

In the water surface map

It's Like a Mirror

Upon using the previous water technique, I have since tried to add an environment background consisting of clouds. I have since found out that the water will reflect the environment map and turn transparent. I have been adjusting the various settings to try and stop the reflection but nothing will work. I have since found a simpler method for creating a similar realistic looking water material.


Let There be Water

So as the group has moved on to starting bits of animation, I have applied the various water techniques that I have learnt about (and blogged) in the first part of the animation. After looking at the water, I wanted to try and create my own material that replicates water. I found an easy to follow tutorial on YouTube (this can be found here: http://www.youtube.com/watch?v=GB5K5_PPczI) to create it. I followed the basic steps from the tutorial. This involved going into the material editor, selecting the slot and changing the shader basic parameter to Anisotropic. I then adjusted the colours to ones that I felt would replicate the colours of the ocean, I then put the specular level up to 200 and put the glossiness up to 50. Going into the maps section of the material, I add bump, reflection and refraction. I then added a map to each of them (noise for bump, falloff for reflection and raytrace for refraction). I then followed the video more closely and changed the martial type from standard to top and bottom. I then went into the bottom half of the material and changed the colour to light blue, from then I went back to the parent and blended the top and bottom materials together.

Water like material in material editor

Water on map scene
Rendered water


Smoke Signals

Today I decided to reattempt creating smoke in 3DS (following on from last years somewhat disastrous attempt in which smoke came out of the cannon) by using the particle systems tool. From there I selected the super spray. I then went into the modify tab and changed certain settings. I adjusted the speed at which the particles generate to 16, as well as changing the particles from ticks to mesh. Using the mesh setting allowed me set the mesh to facing and apply a smokey material to the faces.

For the material I used the 3DS Max smoke material, however this did not look realistic enough, I copied over the image of the smoke from there into Photoshop. I then used the paint brush tool to  paint black around the edges of the image. I then added the material to the opacity map in the material editor.
Smoke Material

 
I rendered the image and was satisfied with the result. I then added the smoke to a Bomb (the same one used to explode the shed and the plane) and adjusted the start time to start after the plane had exploded.I also added further items from the Space Warp section, I went into the forces menu and added wind and drag to the smoke, this slightly adjusted the way in which the smoke blew and it effected the way it reacted. (The higher the wind setting the more the smoke was angled, after a bit of trial and error I found it was best to put the wind strength at 0.72) This is the end result:


Tuesday, 6 November 2012

Individual Contribution to Group Work

In last year's module, 3D Modelling and Animation, I applied a very basic super spray to my da Vinci tank to create smoke after one of the cannons had been used, I want to expand this limited and basic knowledge on particle systems.. I am to do this by working with Jan to create realistic looking explosions, smoke and fire. I also want to learn how to create realistic water using a variety of techniques such as mentalray, raytrace and adding various maps to materials. I know of the various different preset water that already exists within the program. The realistic looking water created will be used in various scenes within the animation, this is vital as there will be many components that will rely on water, such as boats, maps and islands. I will animate the water to make small waves and I will also try and animate the object being placed in the water to make it bob a little. I will also be using various new techniques from the space warps section of 3DS max. After following tutorial and applying those tutorials to objects I have been able to create realistic looking explosions, this means that the object being blown up breaks into various different pieces. This will be vital to the group work as there will be many explosions within the animation. This new technique is not restricted to explosions, I have been trailing a water system that requires reactor to work. This is something that I am finding difficult to use as it is very temperamental. I have also been able to use the system to add wind and drag to a particle system.

Wednesday, 24 October 2012

Goodbye Shed

Following the explosion of the plane, I have now improved the explosion of the shed, I did this by decreasing the fragment size from 150 to 2. This has resulted in the shed exploding into millions of pieces.

Before:


After:

The Big Boom

Using the space warp tool set, I have found an easy way to create small explosions. I created a small plane and added a basic material to it. I then used the preset explosion found in the geometric/deformable set. I bound the explosion to the plane and watched as the space warp broke the plane into 5 pieces. Settings allow the bomb to explode the plane into more by increasing the fragment size. Other items that can be changed are the strength of the bomb, the spin, detonation (this allows the user to pick on which frame they want the bomb to detonate), speed and chaos.


I have attempted to blow up the shed that was created previously, however it didn't work as well as the plane, I will investigate into this further and discover a better method to destroy more solid and 3D objects.

The Shed That Used Many New Tools

Today's task was to create a building using a low poly modelling technique. This meant starting off with a box and creating a building from it. This was then converted into an editable poly which allowed me to select the edges of the box. Using the ring tool was especially helpful when selecting all the edges, as I'd only have to select one and the ring function would select the rest for me. I then used new technique to create more polygons on the box by using the connect tool. This enabled me to specify the width of the new polygon being create as well as the are in which it would be places. This was extremely useful when it came to placing and creating the polygons for the door and the windows. Once I was happy with the placement of the new polygon I used the same method to create a smaller polygon for the door. I then used extrude and bevel tools to create a door frame and the door. I used the same method to create the two windows.


Monday, 8 October 2012

That Sinking Feeling

Following on with my success at creating a realistic wave movement in the water I thought I would challenge myself. I decided to create something else that could be useful to the group and the project. I decided to try and create a ripple effect on the water. With the help of this tutorial (http://www.youtube.com/watch?v=Wa6udmVKGn8&feature=related) and a few hours this is that I managed to create:

Using various different components and of course my favourite mental ray materials I have managed to create a realistic ripple, although the timing of the ball and ripples could be a bit more synchronised (it looked better in 3DS then it did rendered). I used a variety of new tools, such as the space warps and the bind to space warp tool. I clicked onto the geometric/deformable menu and chose ripple. I then used the bind to space warp tool to add the ripple effect to the plane. I was then able to adjust the settings of the ripple through the modify tab. I then added a ball and quickly used the auto key to animate the ripple and ball.

That's The Way The Water Flows

So today, I thought I would try and attempt to create some relatively realistic looking water, simple enough right? There is a preset for water under the mental ray materials. But I wanted to challenge myself further. I wanted to make the water look like it was moving. I started off by creating a plane and assigning the pre-made water material to this plane. I then converted the plane into an editable poly and moved down the modifier list until I found the noise setting. I adjusted the parameters within the noise setting, however I only adjusted them on the Y axis as this would create more realistic wave movement. I then added a plane underneath the newly created water and added some omni lights to emphasis the movement. I then rendered the scene and this is the result:


I used this tutorial from youtube to aid me:
http://www.youtube.com/watch?v=gzzz48iYwUk

Wednesday, 26 September 2012

The Brief - Pearl Harbour

I am looking forward to creating an animation based on Pearl Harbor as it is a part of World War 2 I haven't had the chance to study. Creating the various elements to be included in the environment and the animation will be challenging but something that will be thoroughly enjoyable. Researching the destruction of the harbour and the events that lead up to the attack will provide several ideas that can be included in the animation. As it is a large project we have been asked to complete the project as a group.